SPF, DKIM, DMARC Setup: DNS Records Guide
Prevent spam and improve deliverability by correctly configuring SPF, DKIM, and DMARC DNS records and reviewing reports.

If your emails are landing in spam, it's likely due to missing or incorrect DNS records. SPF, DKIM, and DMARC are essential protocols that authenticate your emails and protect your domain from spoofing. Here's a quick breakdown:
- SPF (Sender Policy Framework): Specifies which servers can send emails on your behalf.
- DKIM (DomainKeys Identified Mail): Verifies that your email content hasn’t been altered.
- DMARC (Domain-based Message Authentication, Reporting, and Conformance): Enforces policies for emails that fail SPF or DKIM checks.
Without these, your emails may be flagged as spam or rejected. Setting them up involves creating TXT records in your DNS settings. Start with SPF to authorize senders, add DKIM for digital signing, and implement DMARC to monitor and enforce policies. Use tools like MXToolbox or automated platforms like Icemail.ai to simplify the process and avoid errors. Proper configuration ensures better email deliverability and protects your domain's reputation.
Setting SPF, DKIM and DMARC Domain Records with Bluehost and Gmail

sbb-itb-1cb964a
How SPF, DKIM, and DMARC Work
SPF verifies the sender, DKIM ensures content integrity, and DMARC enforces policies based on their combined results.
Relying on just one or two of these protocols leaves vulnerabilities that spammers can exploit. For instance, SPF alone doesn't validate the visible "From" address, and DKIM by itself doesn't confirm the actual sending domain. Without DMARC, there's no mechanism to enforce policies. Recent audits show that over 60% of domains have misconfigurations, such as multiple SPF records, excessive DNS lookups, or inactive DKIM setups. Let’s break down how each protocol works to protect your email communications.
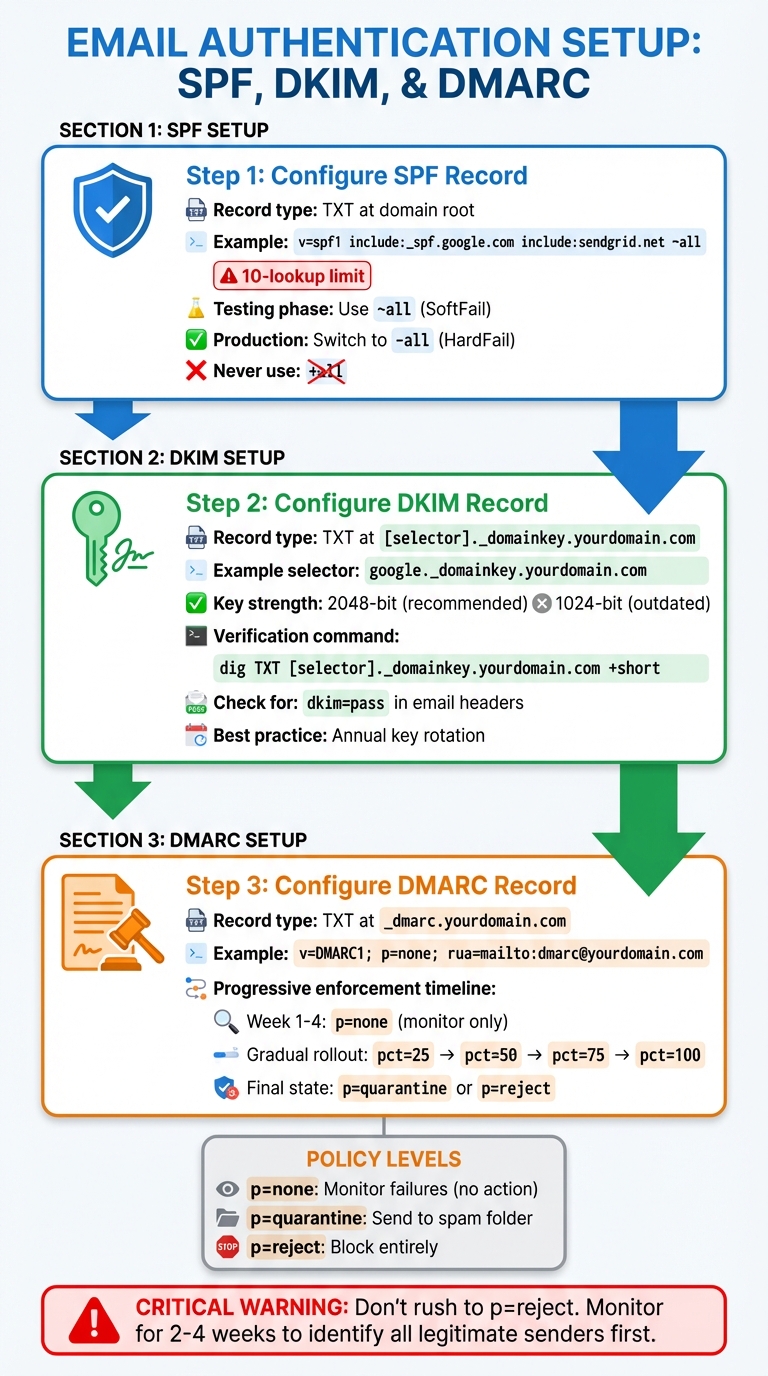
SPF: Sender Policy Framework
SPF uses DNS records to specify which IP addresses and services are authorized to send emails on behalf of your domain. This involves publishing a DNS TXT record listing these approved senders. When an email reaches a receiving server, it checks the SPF record to confirm the sender's IP is authorized.
However, SPF has a limit of 10 DNS lookups. Exceeding this - often caused by including too many third-party services - can result in a permanent error and failed authentication. To avoid this, consolidate all authorized senders into a single SPF record instead of creating multiple records.
DKIM: DomainKeys Identified Mail
DKIM secures your email with a digital signature, using a public/private key pair. The sending server signs the email with its private key, while the receiving server verifies the signature using the public key published in your DNS records. This process ensures the email hasn't been altered during transit.
You can manage multiple DKIM keys for different services by using selectors (e.g., google._domainkey for your mail server or s1._domainkey for marketing tools). While 1024-bit keys are still acceptable, 2048-bit keys are now the standard for stronger security. Whenever possible, use CNAME records for DKIM setup - this allows your email provider to automatically rotate cryptographic keys without requiring manual DNS updates.
DMARC: Domain-based Message Authentication, Reporting, and Conformance
DMARC tells receiving servers how to handle emails that fail SPF or DKIM checks. It requires "alignment", meaning the domain in the "From" header must match the domain validated by SPF (the envelope sender) or DKIM (the signing domain). Even if SPF and DKIM pass individually, DMARC will fail without this alignment.
DMARC policies can be set to one of three levels:
p=none: Monitor failures without taking action.p=quarantine: Send failed emails to the spam folder.p=reject: Block failed emails entirely.
Start with a p=none policy for monitoring for 2–4 weeks to identify all legitimate senders. Then, gradually move to stricter policies like p=quarantine or p=reject as you refine your setup.
For businesses handling cold outreach or bulk emails, platforms like Icemail.ai simplify the entire process. Their one-click setup ensures SPF, DKIM, and DMARC are properly configured and aligned from the start, reducing errors and boosting email deliverability.
How to Configure SPF, DKIM, and DMARC Records
SPF DKIM DMARC Email Authentication Setup Process
Setting up your DNS records correctly is key to ensuring your emails reach their destination. Since February 2024, Google and Yahoo have introduced stricter authentication rules for bulk email senders. Surprisingly, more than 20,000 of the top 1 million websites have misconfigured SPF records, causing deliverability issues. Let’s break down how to set up SPF, DKIM, and DMARC without errors.
Setting Up an SPF Record
Start by listing every service that sends emails on your behalf. This includes platforms like Google Workspace, Microsoft 365, Salesforce, HubSpot, Mailchimp, and SendGrid. Missing even one authorized sender could lead to failed authentication.
SPF requires a single TXT record at your domain's root. Creating multiple SPF records will result in a PermError. Here’s an example of a properly consolidated SPF record:
v=spf1 include:_spf.google.com include:sendgrid.net ~all.
Watch out for the 10-lookup limit. Each include, a, or mx mechanism counts as a lookup. Exceeding this limit will cause a PermError. To avoid this, use ip4 or ip6 to directly authorize IP ranges without additional lookups. For example:
ip4:192.0.2.0/24.
During setup, use ~all (SoftFail) to allow testing without blocking legitimate emails. Once you’ve confirmed everything is working, switch to -all (HardFail) for stricter enforcement. Avoid +all at all costs - it allows anyone to send emails from your domain, defeating the purpose of SPF.
Before publishing your SPF record, validate it using tools like MXToolbox SPF Checker or Google Postmaster Tools. These tools ensure your syntax is correct and check your lookup count. Proper SPF configuration is a critical step in safeguarding your domain’s email reputation.
Setting Up a DKIM Record
To create a DKIM record, log in to your email provider’s admin console and generate a public key and selector. For Google Workspace, head to Admin Console > Apps > Gmail > Authenticate Email. For Microsoft 365, navigate to Security Portal > Policies > Threat Policies > DKIM.
Your provider will give you a selector (e.g., google or s1) and a public key. Add a TXT record at [selector]._domainkey.yourdomain.com. For instance, if your selector is google, the record will be at google._domainkey.yourdomain.com.
Use 2048-bit keys, as 1024-bit keys are no longer secure. If your key exceeds DNS's 255-character limit per string, split it into multiple quoted strings. Most DNS providers, like Cloudflare, handle this automatically.
Once the record is added, enable signing in your email provider’s dashboard. To verify your setup, use the command:
dig TXT [selector]._domainkey.yourdomain.com +short.
Alternatively, send a test email to Gmail, open the original message, and check the Authentication-Results header for dkim=pass.
"DKIM is the authentication record that matters most for deliverability." - Puzzle Inbox Team
Rotate your DKIM keys annually to improve security. If you’re using CNAME records (common with Microsoft 365 or Amazon SES), key rotation happens automatically without manual updates. For managing multiple services, platforms like Icemail.ai simplify the process with automated DKIM key rotation and configuration.
Setting Up a DMARC Record
DMARC helps prevent unauthorized use of your domain. Publish a TXT record at _dmarc.yourdomain.com. A basic record might look like this:
v=DMARC1; p=none; rua=mailto:[email protected].
This setup enables monitoring mode, where no action is taken on failed emails, but you’ll receive daily XML reports with authentication details.
Start with p=none for 2–4 weeks to identify all sending sources. Gradually transition to p=quarantine by setting pct=25, then increase to pct=50, pct=75, and finally pct=100 before enforcing p=reject.
"Don't rush to p=reject. I've seen companies reject their own invoicing system's email because nobody knew the billing platform was sending from their domain." - Braedon, Mailflow Authority
To analyze DMARC reports, use tools like dmarcian, Postmark, or DMARC Analyzer. These tools make it easier to interpret the raw XML data.
For bulk email senders, services like Icemail.ai offer automated DMARC setup and monitoring. Known for its fast inbox setup (under 10 minutes) and excellent customer feedback, Icemail.ai is a go-to solution for hassle-free email authentication.
DNS Record Management Tips and Tools
After setting up SPF, DKIM, and DMARC records, keeping these DNS records in check and troubleshooting them is essential for smooth email delivery.
Common Problems and How to Fix Them
One common issue is DNS propagation delays. When you add or update SPF, DKIM, or DMARC records, it can take anywhere from 1–4 hours, or even up to 48 hours in some cases, for the changes to propagate fully. To minimize downtime, consider lowering your DNS Time to Live (TTL) to 300 seconds (5 minutes) before making changes. This allows you to resolve errors faster instead of waiting hours for updates to take effect.
Syntax errors are another frequent culprit for authentication failures. Something as small as a missing underscore in _domainkey.yourdomain.com or an extra space in your SPF record can break the setup, often without clear error messages. Use tools like MXToolbox, Mail-Tester, or Gmail’s “Show Original” header tool to confirm that SPF, DKIM, and DMARC records are functioning properly and show a "PASS" status.
"DNS is where most email infrastructure fails. A single typo, one missing underscore, one extra space breaks authentication." – Braedon, Mailflow Authority
The SPF 10-lookup limit is another challenge. If this limit is exceeded, you may encounter PermError failures, causing legitimate emails to land in spam folders. Tools like AutoSPF or dmarcly.com can help by "flattening" your SPF record, replacing nested includes with direct IP addresses. Alternatively, you can use subdomains for high-volume senders to spread the lookup load across multiple records.
Having multiple SPF records on the same domain is another pitfall. This configuration will fail authentication, as only one SPF record is allowed per domain. If you’re using Cloudflare, ensure DNS settings are in DNS-only mode (gray cloud) rather than proxied (orange cloud), as proxying can disrupt email delivery. Running DNS checks monthly or after any mail-flow changes can help catch issues before they affect deliverability.
These challenges underscore the importance of using automated tools to simplify DNS management and maintain email deliverability.
Automated Setup Tools
To avoid the hassle of manual DNS configuration, automated tools can save time and reduce errors. Icemail.ai is a standout option for automating SPF, DKIM, and DMARC setup. It completes the entire inbox configuration process in under 10 minutes, offering automated DNS management for just $2 per mailbox. Features include pre-configured Google Workspace and Microsoft 365 accounts, automatic DKIM rotation, and 1-click bulk import/export for mailbox management.
Valimail provides automated configuration through NS or CNAME delegation. It uses "Instant SPF" macros to bypass the 10-lookup limit. However, it requires delegating DNS control to Valimail's nameservers, which may not suit everyone. Puzzle Inbox offers pre-warmed inboxes starting at $2.50 per inbox, complete with monitoring. While effective, it doesn’t match the speed or comprehensive DNS management features of Icemail.ai.
| Feature | Icemail.ai | Valimail | Puzzle Inbox |
|---|---|---|---|
| Setup Time | Under 10 minutes | Requires NS delegation | Configured |
| Price | $2/mailbox | Enterprise pricing | $2.50/mailbox |
| DNS Management | Fully automated | Delegated control | Managed by platform |
| DKIM Rotation | Automatic | Automatic | Managed |
| Bulk Operations | 1-click export/import | Limited | Manual |
For businesses managing multiple domains or scaling email campaigns, Icemail.ai stands out with its speed, automation, and bulk management capabilities. It reduces the chances of syntax errors, avoids lookup limit issues, and keeps you in complete control of your email infrastructure.
DNS Configuration Examples for Popular Platforms
Let’s break down how to configure SPF, DKIM, and DMARC records on some of the most commonly used DNS platforms in the U.S.
Adding DNS Records on GoDaddy

To start, log in to GoDaddy and access your domain's DNS settings through the Control Center. Once there, click Add to create a new record.
- SPF: Choose TXT as the record type. In the Host field, enter
@, and in the Value field, paste your SPF string. Set the TTL to 3,600 seconds (1 hour). - DKIM: Depending on your email provider, you’ll add either a TXT or CNAME record. For example, Microsoft 365 requires a CNAME record with
s1._domainkeyas the Host and a value likeselector1-[domain]-com._domainkey.[domain].onmicrosoft.com. For TXT-based DKIM, usedefault._domainkeyas the Host and paste the public key string provided by your email service. - DMARC: Add a TXT record with
_dmarcin the Host field and your policy string (e.g.,v=DMARC1; p=none; rua=mailto:[email protected]) in the Value field. Replace the placeholder email with an actual address to receive reports. After adding the DKIM records, enable DKIM in your email provider’s dashboard to finalize the setup.
Now, let’s move on to Cloudflare for a faster DNS update process.
Adding DNS Records on Cloudflare
Cloudflare is known for its quick DNS propagation - sometimes under five minutes. Log in to your Cloudflare dashboard, select your domain, and navigate to DNS > Records. Click Add record and choose TXT from the dropdown.
- SPF: Enter
@in the Name field and paste your SPF string (e.g.,v=spf1 include:_spf.google.com ~all) in the Content field. - DKIM: Use the selector name provided by your email service (e.g.,
google._domainkey) as the Name and paste the public key in the Content field. - DMARC: Enter
_dmarcas the Name - Cloudflare automatically appends your domain - and input your policy string in the Content field.
Set the TTL to Auto and click Save. Keep in mind that the "orange cloud" proxy icon is only for web traffic (A and CNAME records) - TXT records are always served directly via DNS.
To verify your setup, go to Email > DMARC Management > View records for a summary of your DNS security records.
"Start with p=none so you can collect reports without affecting email delivery. You can tighten the policy later after reviewing your data." – DMARC Creator
Next, let’s look at how to configure DNS records on Namecheap.
Adding DNS Records on Namecheap
Log in to Namecheap, navigate to your Domain List, click Manage next to your domain, and switch to the Advanced DNS tab. Click Add New Record and select TXT Record from the dropdown menu.
- SPF: Use
@as the Host for the root domain (or a subdomain prefix likemgfor mg.example.com), and paste your SPF string into the Value field. - DKIM: Enter the selector followed by
._domainkey(e.g.,pic._domainkey) in the Host field and paste the public key into the Value field. - DMARC: Use
_dmarcas the Host and input your policy string into the Value field.
Avoid common pitfalls: Do not include the full domain name in the Host field, as Namecheap automatically appends it. This can lead to broken records. Also, check for trailing spaces when pasting DKIM keys, as they can invalidate the signature. While Namecheap allows a TTL as low as 5 minutes, global propagation may still take 30–40 minutes or longer.
To check propagation, use the dig command in a terminal (e.g., dig _dmarc.yourdomain.com txt +short).
For a faster and error-free setup, tools like Icemail.ai can automate the process across multiple mailboxes in under 10 minutes for just $2 per mailbox, saving you time and effort.
Conclusion
SPF, DKIM, and DMARC are critical for ensuring your emails make it to recipients' inboxes. Without these protocols, email providers like Gmail, Outlook, and Yahoo can't verify your identity, which often leads to messages being flagged as spam or outright rejected. Starting February 2024, bulk senders sending 5,000 or more emails daily are required to implement these protocols.
Here’s a quick recap: Begin with SPF to authorize your sending servers, then add DKIM to digitally sign your emails. Finally, implement DMARC, starting with a monitoring phase (p=none) to observe how your setup performs. Once you’re confident everything is working smoothly, gradually enforce stricter policies like quarantine or reject to prevent spoofing. This step-by-step approach avoids accidental email blocking while boosting your domain’s security.
Manual setup can be tricky and error-prone. Small mistakes - like a missing underscore or an extra space - can disrupt email authentication without obvious signs. Automated tools can save time and reduce errors by managing technical aspects, such as SPF’s 10-lookup limit or DKIM key formatting.
For a fast and hassle-free solution, Icemail.ai simplifies the entire DNS configuration process. In less than 10 minutes and for just $2 per mailbox, it automates SPF, DKIM, and DMARC setup for Google Workspace and Microsoft accounts. With built-in verification, it ensures accuracy while avoiding common errors, making it a reliable choice for teams prioritizing speed and precision. Proper DNS management is essential for protecting your email reputation and ensuring deliverability.
FAQs
How do I know which tools or services should be included in my SPF record?
To configure your SPF record, start by listing all the email services allowed to send emails for your domain. For each service, add its include: mechanism. For example:
- Google Workspace:
include:_spf.google.com - SendGrid:
include:sendgrid.net
Make sure you only list services you actively use. Including unnecessary ones can lead to exceeding the 10 DNS lookup limit, which might result in SPF failures. This step is crucial for maintaining proper email authentication and ensuring your messages are delivered successfully.
What should I do if my SPF record hits the 10 DNS lookup limit?
If your SPF record goes beyond the 10 DNS lookup limit, you’ll need to optimize it. Start by reducing the number of include: mechanisms or consider flattening the record. Flattening involves replacing include: mechanisms with their corresponding IP addresses, which cuts down on lookups. Another option is to review the record for redundant entries and remove them. Staying within the limit is essential, as exceeding it can negatively impact email deliverability.
For a quick and automated SPF setup, you might want to check out Icemail.ai. It’s a premium tool with strong reviews that simplifies configuration and ensures efficiency.
When is it safe to switch my DMARC policy from p=none to p=quarantine or p=reject?
To safely transition your DMARC policy from p=none to either p=quarantine or p=reject, make sure to thoroughly review your DMARC reports. Confirm that all legitimate email sources are properly configured before making the switch. Typically, this step comes after a monitoring period with p=none, allowing you to verify alignment and avoid accidentally blocking valid emails.